반응형
developer.android.com/guide/navigation/navigation-getting-started
탐색 구성요소 시작하기 | Android 개발자 | Android Developers
이 주제는 탐색 구성요소를 설정하고 사용하는 방법을 설명합니다. 탐색 구성요소의 대략적인 개요는 탐색 개요를 참고하세요. 환경 설정 참고: 탐색 구성요소는 Android 스튜디오 3.3 이상이 필요
developer.android.com
- Include the Jetpack Navigation library
- Add a NavHost to the activity
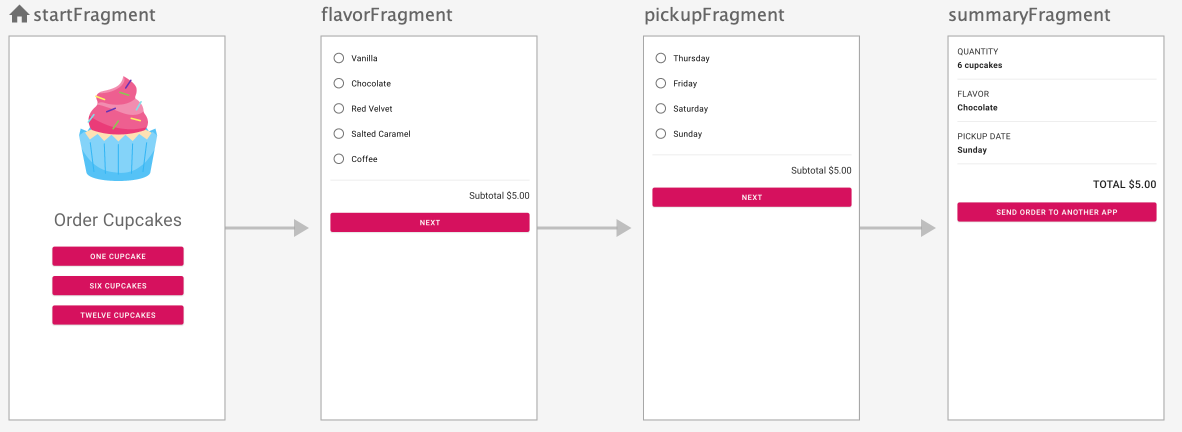
- Create a navigation graph
- Add fragment destinations to the navigation graph

nav_graph.xml
<navigation xmlns:android="http://schemas.android.com/apk/res/android"
    xmlns:app="http://schemas.android.com/apk/res-auto"
    xmlns:tools="http://schemas.android.com/tools"
    android:id="@+id/nav_graph"
    app:startDestination="@id/startFragment">
    <fragment
        android:id="@+id/startFragment"
        android:name="com.example.cupcake.StartFragment"
        android:label="fragment_start"
        tools:layout="@layout/fragment_start" >
        <action
            android:id="@+id/action_startFragment_to_flavorFragment"
            app:destination="@id/flavorFragment" />
    </fragment>
    ...
</navigation>
StartFragment.kt
findNavController().navigate(R.id.action_startFragment_to_flavorFragment)++ StartFragement.kt 에서 FlavorFragment로 가는 action_startFragment_to_flavorFragment 를 호출
Get the NavController using findNavController() method and call navigate() on it, passing in the action ID, R.id.action_startFragment_to_flavorFragment. Make sure this action ID matches the action declared in your nav_graph.xml.
Update title in app bar
MainActivity.kt
class MainActivity : AppCompatActivity(R.layout.activity_main) {

    override fun onCreate(savedInstanceState: Bundle?) {
        super.onCreate(savedInstanceState)

        val navHostFragment = supportFragmentManager
                .findFragmentById(R.id.nav_host_fragment) as NavHostFragment
        val navController = navHostFragment.navController

        setupActionBarWithNavController(navController)
    }
}
nav_graph.xml (res/navigation/)
<navigation xmlns:android="http://schemas.android.com/apk/res/android"
    xmlns:app="http://schemas.android.com/apk/res-auto"
    xmlns:tools="http://schemas.android.com/tools"
    android:id="@+id/nav_graph"
    app:startDestination="@id/startFragment">
    <fragment
        android:id="@+id/startFragment"
        android:name="com.example.cupcake.StartFragment"
        android:label="Change label attribute what you want"
        tools:layout="@layout/fragment_start" >
        <action
            android:id="@+id/action_startFragment_to_flavorFragment"
            app:destination="@id/flavorFragment" />
    </fragment>
    ...
</navigation>
++android:label="Change label attribute what you want"
반응형
'Android' 카테고리의 다른 글
| View Binding 뷰 결합 (0) | 2021.03.09 |
|---|---|
| Tip (0) | 2021.02.15 |
| MainActivity.kt (0) | 2021.02.11 |
| [Jetpack Kotlin Android] ViewModel (0) | 2021.02.09 |
| Notes... (0) | 2021.02.09 |


댓글