
Note: When you override the onCreate() method, you must call the superclass implementation to complete the creation of the Activity, so within it, you must immediately call super.onCreate(). The same is true for other lifecycle callback methods.
Note: A good convention is to declare a TAG constant in your class:
const val TAG = "MainActivity"
and use that in subsequent calls to the log methods, like below:
Log.d(TAG, "onCreate Called")
Note that onStart() is paired with a corresponding onStop() lifecycle method. If the user starts your app and then returns to the device's home screen, the activity is stopped and is no longer visible on screen.
- Press the Home button on the device, and then use the recents screen to return to the activity. Notice that the activity resumes where it left off, with all the same values, and that onStart() is logged a second time to Logcat. Notice also that the onCreate() method is usually not called again.
Note: The key point here is that onCreate() and onDestroy() are only called once during the lifetime of a single activity instance: onCreate() to initialize the app for the very first time, and onDestroy() to clean up the resources used by your app.
Note: The important point here is that onStart() and onStop() are called multiple times as the user navigates to and from the activity.
여기서 중요한 점은 사용자가 활동을 탐색 할 때 onStart () 및 onStop ()이 여러 번 호출된다는 것입니다.
So what about onRestart()? The onRestart() method is much like onCreate(). Either onCreate() or onRestart() is called before the activity becomes visible. The onCreate() method is called only the first time, and onRestart() is called after that. The onRestart() method is a place to put code that you only want to call if your activity is not being started for the first time.
Both onResume() and onPause() have to do with focus. The onResume() method is called when the activity has focus, and onPause() is called when the activity loses focus.
Android Navigation
developer.android.com/guide/navigation/navigation-getting-started
탐색 구성요소 시작하기 | Android 개발자 | Android Developers
이 주제는 탐색 구성요소를 설정하고 사용하는 방법을 설명합니다. 탐색 구성요소의 대략적인 개요는 탐색 개요를 참고하세요. 환경 설정 참고: 탐색 구성요소는 Android 스튜디오 3.3 이상이 필요
developer.android.com
Also similar to activities, the Fragment class provides many methods that you can override to respond to lifecycle events.
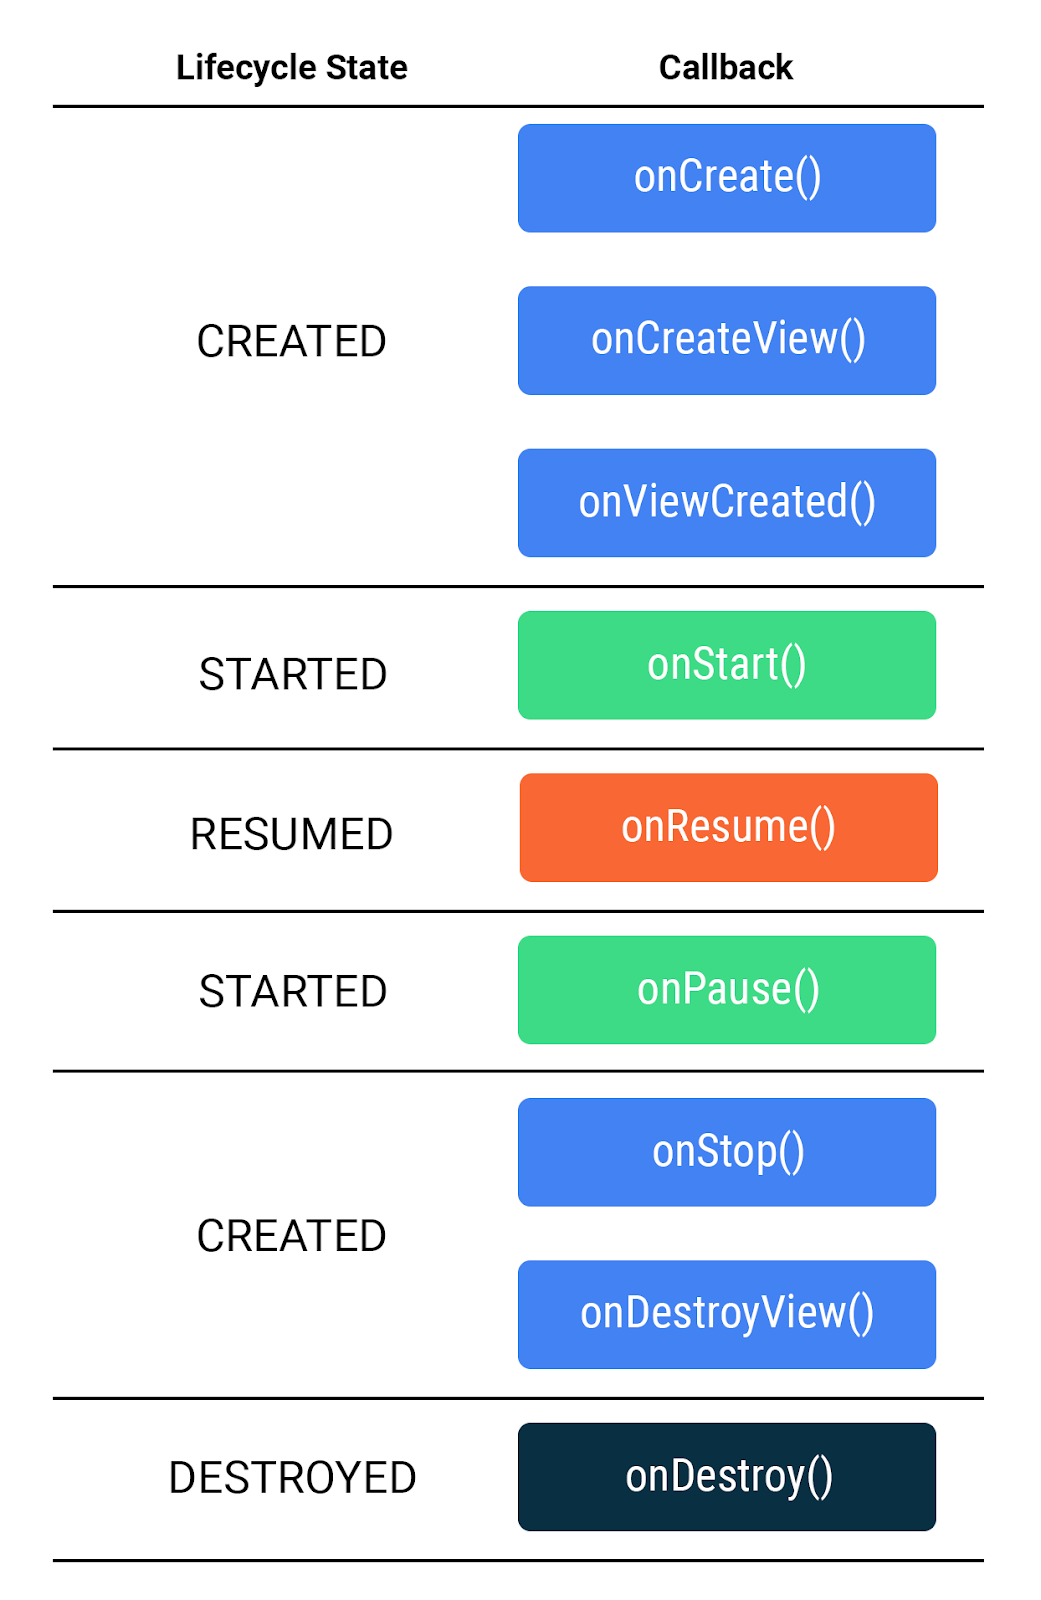
- onCreate(): The fragment has been instantiated and is in the CREATED state. However, it's corresponding view has not been created yet.
- onCreateView(): This method is where you inflate the layout. The fragment has entered the CREATED state.
- onViewCreated(): This is called after the view is created. In this method, you would typically bind specific views to properties by calling findViewById().
- onStart(): The fragment has entered the STARTED state.
- onResume(): The fragment has entered the RESUMED state and now has focus (can respond to user input).
- onPause(): The fragment has re-entered the STARTED state. The UI is visible to the user
- onStop(): The fragment has re-entered the CREATED state. The object is instantiated but is no longer presented on screen.
- onDestroyView(): Called right before the fragment enters the DESTROYED state. The view has already been removed from memory, but the fragment object still exists.
- onDestroy(): The fragment enters the DESTROYED state.
The chart below summarizes the fragment lifecycle, and the transitions between states.
NOTE: When making a variable nullable using !!, it's a good idea to limit its usage to only one or a few places where you know the value won't be null, just like you know _binding will have a value after it is assigned in onCreateView(). Accessing a nullable value in this manner is dangerous and can lead to crashes, so use sparingly, if at all.
Navigation Dependency
1. In the project-level build.gradle file, in buildscript > ext, below material_version set the nav_version equal to 2.3.1.
buildscript {
    ext {
        appcompat_version = "1.2.0"
        constraintlayout_version = "2.0.2"
        core_ktx_version = "1.3.2"
        kotlin_version = "1.3.72"
        material_version = "1.2.1"
        nav_version = "2.3.1"
    }

    ...
}
2. In the app-level build.gradle file, add the following to the dependencies group.
implementation "androidx.navigation:navigation-fragment-ktx:$nav_version"
implementation "androidx.navigation:navigation-ui-ktx:$nav_version"
Safe Args Plugin
When you first implemented navigation in the Words app, you used an explicit intent between the two activities. To pass data between the two activities, you called the putExtra() method, passing in the selected letter.
Before you start implementing the Navigation component into the Words app, you'll also add something called Safe Args—a Gradle plugin that will assist you with type safety when passing data between fragments.
Perform the following steps to integrate SafeArgs into your project.
1. In the top-level build.gradle file, in buildscript > dependencies, add the following classpath.
classpath "androidx.navigation:navigation-safe-args-gradle-plugin:$nav_version"2. In the app-level build.gradle file, within plugins at the top, add androidx.navigation.safeargs.kotlin.
plugins {
    id 'com.android.application'
    id 'kotlin-android'
    id 'kotlin-kapt'
    id 'androidx.navigation.safeargs.kotlin'
}
3. Once you've edited the Gradle files, you may see a yellow banner at the top asking you to sync the project. Click "Sync Now" and wait a minute or two while Gradle updates your project's dependencies to reflect your changes.

Once syncing is complete, you're ready to move on to the next step where you'll add a navigation graph.
'Android' 카테고리의 다른 글
| MainActivity.kt (0) | 2021.02.11 |
|---|---|
| [Jetpack Kotlin Android] ViewModel (0) | 2021.02.09 |
| [Android Studio, Windows 10] Starting Emulator with Consol (0) | 2020.11.20 |
| [Android Studio] 프로젝트 내의 원하는 문자열 찾기 Find in Path... (0) | 2020.06.18 |
| [Android Studio] 라이브러리 참조 / 직접 경로 입력 (0) | 2020.06.18 |


댓글